Went to the workshop again today. A failed attempt on Saturday to replace the head gasket was deemed to be due to either a too thin gasket or wrong dimension of the rubber connections between the head and the water pump. Water in oil etc immediately. When I came this morning, they were waiting for a thicker headgasket and new rubber rings, and I returned just after lunch to assist on the reassembly.
A long story in short - we were once more dissappointed. The engine fired up, but we quickly spotted water going into the oil as well as overheating again.
So what could this be? Water pump has been ruled out. Termostat as well. The head has been in for a full check inluding pressure testing. We have repeatedly flushed radiator and engine block. It looks as though the issue sits in the block somewhere; a crack or something which allows hot exhaust to enter the water jackets.
The conclusion was easy. In stead of spending more time and money on trial and error on this engine, I will try to source a new shortblock or engine. Maybe the car will be ready to leave England for Easter then?
I am of course a bit disappointed, but the car is approaching 40 years so one should expect the unexpected. And the guys at Classicarco - Mike, Gary and Mark, are almost embarrassed about all these problems plus the fact that they would like to see the car leave happily as their workshop is full of other urgent projects. But again - this sometimes goes with the trade of old cars. I guess it would not be that interesting if everything always went straight without exemption. But again - After quite a few Volvos, this is the first time an engine gives up for me. Unbelievable.
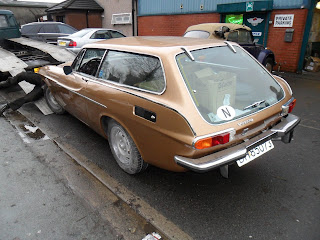
Tuesday, 1 March 2011
Thursday, 24 February 2011
Old cars definitely have got soul.....

So I arrived as scheduled to Manchester yesterday morning, and after checking in at my hotel I went straight to Classicarco to see the car for the first time after painting.

As the pictures show, the Volvo looks just as it should. Very nice, and the gold metallic looks just so much better than the brownish gunk that covered it before. However, I was already informed that Classicarco had experienced a lot of problems setting up the Bosch D-Jetronic injection after installing the new fuel pump I had brought from Holland. During the process which was still ongoing when I arrived, it showed out that the injection system already had been tampered with in the past, possibly due to a weakening pump, so when installing the new pump the pressure went wrong and a failed pressure regulator was not able to adjust for the change.
In addition, sediments in the tank had for some reason chosen the moment to release into the fuel system and managed to clog up the new filter installed, and the result was simply chaos. At one moment everything worked just fine, then suddenly the engine would show clear symptoms of either overfuelling or starvation.
When things worked just fine after a few hours of adjustments, discussions and testing, I went together with Gary for a test drive. Most of the trip went just as it should, but some hesitation symptoms, rare at first, the more frequent were not reassuring. I also noticed that the engine was getting hotter than it had used to be before .
Back at the workshop after the test drive, the engine got suddenly hot with the gauge going into the red zone, and we shut it off. "Serious underfuelling, thus overheating" was the theory.
We checked further, and we found. Clogged filter and serious amounts of shit in the fuel lines leading towards the filter. The tank was emptied, the pump and filter went off and we opened the tank for visual inspection. It showed to be in very good condition, although some visible sediments were there, and the tank was flushed until it looked clean inside.
Because the new pump was different from the original pump (NLA since several years), Gary had made a new panel in front of the tank housing both the filter and the pump. A new filter was purchased, but now the pump itself was suddenly behaving strangely. After hours of testing, the fault was found to be in the no-return valve which came with the pump. The valve had a tendancy to get stuck, and after releasing it with a screwdriver or compressed air it would go stuck again after a while. We decided to drill out the valve as it has no real function on this setup. Finally we could reassemble the fuel injection system, start up and test.

And everything seemed just perfect...... until we again noticed that the engine got really hot, and quickly this time. After checking and discussing, the termostat was taken out and found to be faulty. A new one was purchased, checked and installed - no improvement. Next theory was that the water pump had gone bad. We took it off, but found no signs whatsoever why it should malfunction. After a lot more checking, we reassembled the water pump again, checking thoroughly for all kind of possible airtraps in the cooling system, only to find out that the engine was still overheating, only faster this time.
The conclusion after all this was that only a blown head gasket could possibly cause this kind of rapid overheating, and we decided to take off the cylinderhead and inspect further.

While taking off the head, we noticed two things, 1) The bolts seemed to need little torque to come loose 2) The (very thin) gasket had clear signs of leakage around cylinders 3 and 4.

At the moment, new gaskets and various stuff have been ordered, and should arrive latest on Monday. It may still be possible to get the car ready for departure next Wednesday, but in case new issues should arrive the car will have to stay in Manchester until Easter, which could be the next possible occasion to pick it up.
Strange thing, I am not disappointed at all, because I had expected and planned for all kind of problems. However, I am a bit surprised that the engine which has been working flawlessly since I bought the car in 2006 suddenly beomes the hellraiser. However, a B20E with its pretty high compression ratio and somewhat sophisticated fuel injection system could always cause some concerns of this kind after having been tampered with.
I feel a bit sad for the guys at Classicarco though, because they are not at all pleased with this happening. They have done a great job on the car so far, and when working with a 38 year old lady with quite some soul left even after chirurgical removal of several kgs of rust + a complete new and shiny makeup, one should not be surprised that such things might happen....
Saturday, 5 February 2011
Soon ready for pick-up!
Time flies, but finally I have agreed with Mark to travel to Manchester on February 23rd to collect the car. I count of spending 2-3 days to test, go through and readjust various issues before leaving Manchester. Petter, my youngest son will join me on the 27th. Before heading for Hull and the ferry we intend to spend a couple of days in North Yorkshire.


The assembly seems to have been going smoothly, but some problems are still remaining. Yesterday I had to email wiring diagrams to the workshop, so it seems that some electrical gremlins are persisting. Quite as expected, taking into account that the car has been quite disassembled during the process.


Some new parts have been purchased such as door locks, windscreen, roof and bonnet lining as well as exterior trim. And at home a set of 4 renovated alloy wheels are waiting to be fitted together with some new rubber, the old tyres must be close to 15 years old now.
Last, but not least - The new fuel pump, which was purchased in Holland has been installed. Hopefully this should cater for no surprises with sudden death on the Autobahn on the way home.
Tuesday, 21 September 2010
In the paint shop

Finally - things have evolved slowly, and I have not been that busy with blogging either, but at last the paint is being done just in a few days. Got a mail from Mark with some paint samples:


It is always extremely difficult to judge precisely a color through a sample picture, so I returned the following photo found somewhere on the web of a -72 1800ES in 105 Volvo Gold Metallic as my car also had initially:

After a few days I got what I waited for - Photos of the repainted body:


This looks amazing - Reassembly remains, and I am waiting for an estimate on completion.
Thursday, 10 June 2010
Bodywork nearly finished!

Got an update from Mark at Classicarco last week. Both new fenders are now welded on after repairing hidden rot underneath, and the car was taken to another workshop for sodablasting (don't ask me precisely what it is, because I couldn't answer) of some suspicious spots. A few of those were as could be expected in the windowsills, others were at some parts of the floorpans and the bottoms of the doors. The blasting revealed of course some more rot, but luckily nothing serious. Another typical minor damage was found under the rubber seals for the rear glass door. A surprising place to find rustholes was beneath the rear window on the driver's side, just behind the door. There was no indication of rust there which I had previously spotted. As the pic below shows, this was repaired but cutting out a section and weld in a new. The floorpans were not too bad, but some repair sections have been ordered to repair the weaknesses discovered after the blasting.


So next - Prepairing for the paint shop!
Sunday, 23 May 2010
How to build an 1800ES body
This video, borrowed from the Swedish P1800 club, shows in a pretty detailed way how the body of the 1800 was manufactured in 1972-73 at the Olofström plant. Even if it was in a way mass production, the rate was so slow (8.048 cars in about two years) that quite a number of operations relied entirely on manual adaption and real workmanship. It was also constructed in a way which involved making a number of "invisible" weldings like at the front where the front wings meet the nose and towards the windscreen, typical for a sportscar of that time. The way it was done is shown in great detail in the video; first manual adjustment (using steel scissors), the gas welding and grinding, and finally lead sealing of the seams to make them completely invisible after painting. Amazing to watch!
Unfortunately, even if a number of measures were taken to protect the body against rust, the construction itself contained a number of hidden bombs which were almost impossible to avoid over some time. The result is that almost all 1800's which were in regular use developed serious rust problems after few years. Front crossmember, wings, sills etc. just rotted away, and when it finally became apparent, the full extent of the damage was still hidden underneath.
My car seems to have avoided the worst, even if it also showed to conceal quite some damage under a still decent surface. The reason is certainly that the worst was stopped by cleaning and surface treatment of the inner sills about 25 years ago, the fitting of inner mudguards and finally stopping using the car during winter, thus avoiding the salted roads. For those not particularly familiar with the P1800 and looking for one to buy, this should serve as a warning. A decent exterior can hide serious rot, which might in the worst cases cause the car to be dangerous to drive and even fail the inspection. There are simply no quick or cheap fixes to this, and anyone in this situation should know the risks involved and make the most to know what they actually consider buying. But I know the feeling; it's almost as taking a look at puppies even if getting one was not exactly the plan. The 1800 is simply so breathtaking in its lines that common sense can evaporate in a split second. I was definitely lucky with mine, but I know several cases of people who were not.
Update 25/5: Joyful news, as Mark has informed me that both wings are now finally fitted. They are now working on cleaning window apertures and floor pans. If nothing major is discovered during this process, then the next step will be to prepare the car for the paint shop. The doors have meanwhile been given a special treatment, involving paint stripping and dipping to eliminate any rust. Pictures promised in a few days!
At Classicarco - Time for Makeover!
It felt just Great to arrive at Classicarco's workshop in Manchester, after the events in Holland and my worries on the remaining stretches of once more loosing power on the Highway. But everything worked perfectly, and after meeting with Mark and his guys, the Volvo went in for a thorough inspection.
The car had obviously been worked at sometime around the mid eighties or early nineties in order to stop ongoing corrosion, but the budget had not allowed the already visible damage to be properly repaired. The already mentioned rough patches on the car all date from this job, and as a very efficient way to protect the already damaged front fenders, interior mudguards from Lokari had been fitted. First thing was to have them removed, and beneath everything looked perfect, dry and well covered with protective wax. This shows clearly that such mudguards can be recommended for all 1800's which do not serve as trailer queens only.
The initial inspection did not reveal any other unknown faults, but the questionmarks about the true condition of the fenders and sills would remain until the work of looking beneath could start. After this I left Manchester to visit my son who is studying in Northern Yorkshire.


A few weeks later, Mark started to send me emails about their various findings. The most worrying was that both front fenders were in fact quite severely corroded, and he therefore recommended a full replacement as the only advisable remedy. Sills were in far better shape, except for an area at the base of the A-pillars which was a quick fix after removing the outer sill. The main problem of having fenders replaced on any P1800 is just to find them. They are quite expensive, and as they require extensive visible welding after fitting it is an expert job. The left fender was available and immediately ordered, whereas the right was reported out of stock for several years. It is said that they will become available as a reproduction later this year, but timing is highly uncertain.
The breakthrough came when Mark reported back that he'd found a supplier in UK who had a NOS RH fender in stock with some surface rust and minor dents, asking for a high price. I told him to grab it quickly, and the negotiated price showed to be reasonable and the damage from storage was only superficial.


To date, and as the enclosed photos show, the bodywork has advanced to replacement of both fenders and the sills have been repaired. Next update will come when the car starts to be prepared for new paint - 105 Gold Metallic of course!
Subscribe to:
Posts (Atom)